Baby Russian tortoises have very
similar needs to adult Russian tortoises. A requirement of higher humidity and
hydration is the main difference. With good humidity, UVB, and healthy food, your
tortoise will grow healthily and smoothly. If kept too dry, they will have
irregular, pyramided shell growth, and may appear stunted. You can transition
to an ‘adult’ RT care regimen once your baby is 4” (10cm) or larger SCL, or 2-3
years old.

WHAT TO DO UPON ARRIVAL:
When your baby arrives, you can unpack her and set her in a small bowl of shallow lukewarm water – just up to the seam where the top shell and the bottom shell meet - for 10 or so minutes. Then place her in her enclosure in front of a pile of greens. She might eat right away, or she might just explore.
When your baby arrives, you can unpack her and set her in a small bowl of shallow lukewarm water – just up to the seam where the top shell and the bottom shell meet - for 10 or so minutes. Then place her in her enclosure in front of a pile of greens. She might eat right away, or she might just explore.
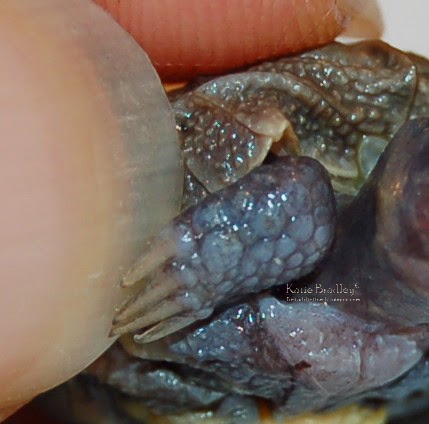
Don't be shocked when you pick her up - baby tortoises have some
"flex" in their shells - they are not hard yet like adult tortoises.
As they ingest calcium, the shell will harden. It will be fairly hard by 18
months. The belly hardens more slowly than the carapace.
You may observe small, light-colored ‘squiggly’ lines in the
tortoise’s shell keratin – these are normal in growing tortoises, and are also
a sign that the animal is well-hydrated. Below is a good example of a well-hydrated juvenile Russian tortoise.
 |
| (picture used with permission from Siu) |
WARNING: baby tortoises are VERY quick! If you are picking up
the tortoise, please secure it so it can’t jump/run off your hand.
INDOOR HOUSING:
Russian tortoise babies
should be kept in an enclosure that
provides room to roam, safety from other pets (e.g. dogs and cats), and holds
in warmth and humidity well. For this reason, open-top tortoise tables are
often not ideal for the first year, as too much humidity is lost otherwise, and
the wood can start rotting from the high humidity.
.JPG)
A space of 1.5ft x 3ft floor dimension is sufficient for 1
baby. Of course once they get bigger, Russian tortoises need much more space
(e.g 3ft x 6ft or more)! Depending on the location of the enclosure, it may be
necessary to insulate it – I have taped
foil-covered Styrofoam insulation board around 3 sides of my baby tank. The
foil bubble wrap-looking insulation works well, too.
This picture shows a creative solution
Jessica found using a 54gal Rubbermaid bin. She cut out a portion of the lid,
and replaced it with mesh that is held on by Velcro, for easy access, and to
keep her cat out. Please note that mesh filters out UVB light, so should not be
used under the light source.
More information about
lighting will be provided below.
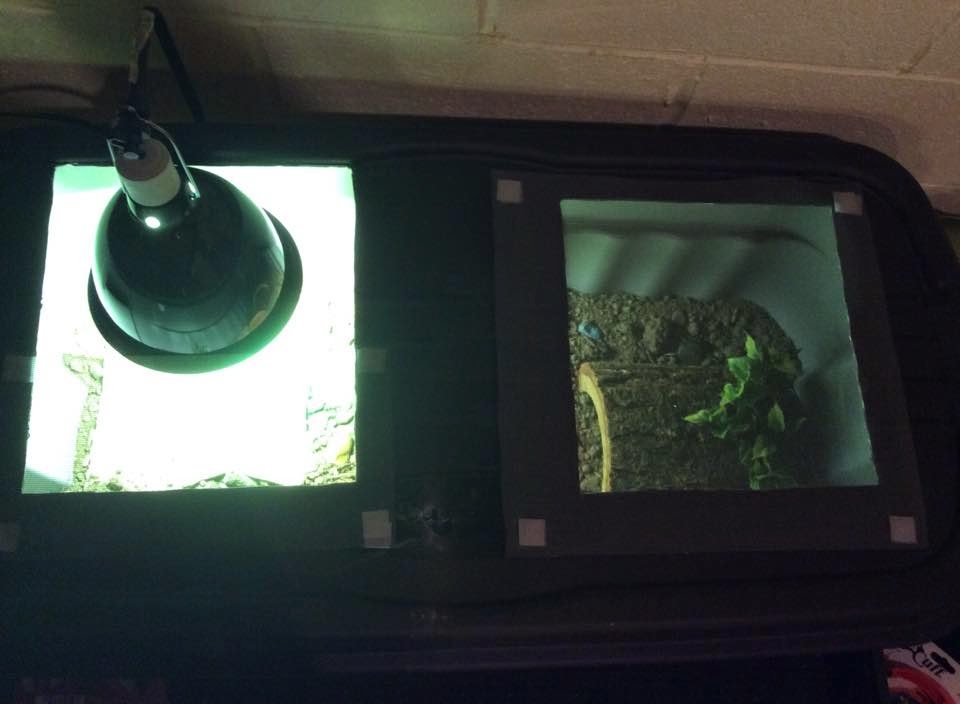 |
| (picture used with permission from Jessica) |
For substrate I put in about 5” of ACE brand topsoil, mixed with
coconut coir. Any additive free soil without perlite or fertilizers or manure
will work, but I have found the ACE brand to consistently be good, and it has a
nice consistency. I buy it at ACE Hardware.

The soil should be kept pretty
moist, enough that if you run your finger across it, it looks a little muddy. I
pack it down enough that it provides secure footing. I place a flat stone under
the basking spot, and place a nice little landscape of large and small rocks
and plants throughout the enclosure, keeping safety in mind.
I add 20-ish pill bugs into the enclosure from our yard – they come out at night and clean up any poop or left over plant matter!
All tortoise babies should be given constant access to a water dish, so that they can drink and
soak as needed. I like to use a 4” glazed plant saucer, with several pebbles or
small rocks in it, to help baby get in and out safely. Placing a few rocks
around the water dish will also help less of the substrate to be tracked into
the water.
Please be sure to read
below info about soaking your baby!
 |
| (picture used with permission from Jessica) |

I place a flat rock under the basking lamp, to keep the basking temperature
more constant, and I also place a flat rock somewhere in the mid-section of the
enclosure, for feeding on. This will later help keep claws and beak nice and
healthy.
You can put a variety of
drift wood and rocks, tortoise safe plants (in a pot with additive free soil,
or planted into the substrate), into the tortoise enclosure to provide climbing/exploring
opportunities. Please be mindful of safety… you don’t want baby to flip over
into the water, or get stuck behind something.
In addition to the top
soil/coco coir substrate, the baby tortoises have moist sphagnum moss in their
hot humid hide (see below), as well as in their favorite hang-out spots, and
they dig and burrow extensively.
I use a humidifier
(which is optional – it just makes my life easier), and I mist them with warm
water every time I walk by, minimum of 4x per day using a pump mister that I
got at the garden center (see pic below). Be sure to unscrew the lid
after each use to release the pressure… otherwise the pump will leak!

HOT HUMID HIDE:
If your tortoise is still a baby or juvenile (under 4") it will
benefit from a hot humid hide. I
like the plastic shoe boxes from the dollar store. I cut a round or square door
hole in about 1" -1.5" up from the bottom.

I fill it with wet sphagnum moss
(garden center usually has it near the orchids).
Then I sink the hide into the substrate in the middle of the enclosure,
between the hot end and the cool end. I
suspend a 60W ceramic heat emitter (CHE) above it, attached to a Hydrofarm thermostat, with the probe inside the
hide. I set the thermostat to 80 degrees F. It is REALLY IMPORTANT to use a
thermostat, because otherwise the CHE can overheat the whole tank.
 |
| Do you like my turkey-pan cover?! |
The CHE that heats
the hot humid hide stays plugged in 24/7, and is controlled by the thermostat. The key is to keep baby humid and WARM
(since moist+cold is bad). Personally, I prefer a CHE over a heat pad - if you use a heat
pad, you still need a thermostat. Burning from below can be severe if the
bottom of the enclosure becomes too hot, which is why many choose to heat the
hot humid hide from above.
Here is a pic of an example of the hot humid hide box a friend made for
himself.

OUTDOOR SPACE:
Tortoises require UVB light to grow healthy bones and shells, and the
very best source of UVB is natural sunlight. Because of this, I try to provide
at least 30 minutes of outdoor time to the babies any time it is at least 70
degrees outside.
IMPORTANT: Baby tortoises
can overheat very easily! Please never leave them unattended on a hot day.
Please ALWAYS place their outdoor bin in a location that is half shaded, half
in the sun. If necessary, you can move the bin as the sun moves. Frequent
misting will help prevent the babies from drying out. Please also be mindful of
other animals or children that might harm your baby tortoise!

I made a planted outdoor rubbermaid bin that the babies spent 30 mins to 3 hours in daily during the Summer. Before adding the dirt, I drilled several drainage holes into the bottom. This helps prevent flooding. The hides are made of plastic flower pots that I cut in half, and layered several inches of dirt over top for insulation. The tortoises really enjoyed climbing the little hills! The water dish is similar to the one in the indoor enclosure. I planted some succulents and weeds in there, placed more moss, and I also spread some of Carolina Pet Supply’s ‘Broadleaf seed mix’ in here. Within weeks it was a jungle in there!
Here is another view of the outdoor tortoise bin, with the lid on. I
used a Dremel to cut out part of the lid, drilled small holes all around, then
zip-tied hardware cloth (similar to chicken wire, but with smaller holes) into
the lid. The locking lid let in the sunshine, but prevented predators from
getting in.

One tortoise friend of mine
got a little wheeled dolly and placed the baby bin onto it. This allowed them
to wheel the bin to different locations in their yard, depending on where the
sun was! Great idea, Lynne!
LIGHTING:
Because lighting for
baby tortoises is the same as for adult tortoises, please read the following
article first: http://tortaddiction.blogspot.com/2014/05/quick-summary-of-lighting-for-tortoises.html
Baby tortoises require
basking light (95 degrees F at shell height), a UVB source (either separate
from the basking light, or an all-in-one MVB such as the Powersun), and a heat
source for their hot humid hide. DO NOT use the coil-style UVB bulbs because
they are also known to cause damage to tortoise’s eyes.
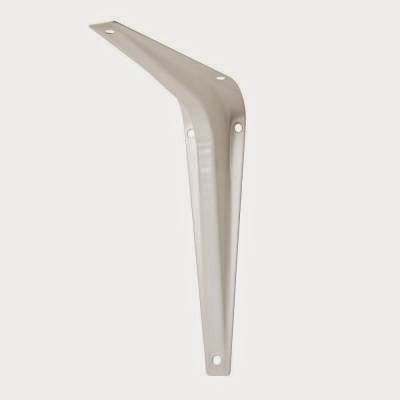
When setting up an
enclosure, I securely install L-shaped shelf brackets (from Home Depot) onto
the wall, and use wire and/or a small chain to hang the basking light and the
CHE. I DO NOT rely on the clamps that often come with the lamps.
I have all my lights (NOT
the CHE) plugged into a timer to turn them on/off.
Here is a creative solution
my friend Bobbye came up with for hanging the lights. She bought the shelf
brackets that can be used with a hang bar! I have seen a similar set-up where
the tortoise keeper used S-hooks to suspend the lights off of the bar. I love
this, because it allows you to move the lights back and forth as needed, and
you can adjust the height, too.
 |
| (photo used with permission from Bobbye) |
For a glass
tank, if I am using a tube-style UVB light, I lay the fixture across the top
and secure it with duct tape on either end. In a rubbermaid tub, I hang the UVB
light fixture by drilling some small holes into the long wall of the rubbermaid,
and feeding zip ties through it. The fixture has holes, or you can loop the zip
tie all the way around the fixture on each end. The UVB tube should end up
being 12-13" above the top of the substrate to be effective. .
Here are a few diagrams, as seen from
above and from the side, of possible set-ups:
 |
| view from top |
.jpg) |
| View from front |
If you plan to use a 40gal
glass tank, I would use a 75W household bulb for basking, in combination with
the tube-style UVB light. If you are setting up a 54gal Rubbermaid bin, or a
75gal glass tank (or larger), I would use the 100W Powersun MVB, which produces
heat and UVB.
I order my lighting supplies
online, because this is cheaper than going to a pet store. I'll provide a list
below that I've put together. No pressure to get those exact items, I just know
that 'new' tortoise keepers sometimes like to get specific information
sometimes.
in this
fixture: http://www.amazon.com/gp/product/B000HJ75PW/ref=ox_sc_sfl_title_1?ie=UTF8&psc=1&smid=ATVPDKIKX0DER (you remove the
plastic cover)
A regular household light bulb (75W) such
as this: http://www.amazon.com/GE-Lamps-41032-75-Watt-4-Pack/dp/B000X7T6O6/ref=sr_1_1?ie=UTF8&qid=1413596854&sr=8-1&keywords=75+watt+light+bulb with this
fixture: Zilla
11596 8-1/2-Inch Premium Reflector Dome For Up to 150-Watt Bulbs, Black (later
when you have a larger enclosure you can switch to using an all-in-one bulb
like the 100W Powersun, but for the small baby enclosure, 100W ends up being
too much). You can also get a fixture at ACE Hardware etc - just make sure the
socket is ceramic.
For the first
2 or so years, baby requires a hot humid hide. I use either a 60W CHE (ceramic heat emitter) like
this http://www.amazon.com/Zoo-Med-ReptiCare-Ceramic-Infrared/dp/B0002AQCPK/ref=sr_1_2?ie=UTF8&qid=1413596425&sr=8-2&keywords=ceramic+heat+emitter and you can use a
smaller ceramic dome fixture for this, since the CHE is only 60W. Alternatively,
you can use a heat pad under the tank where the hot humid hide is. To regulate
the temperature, the Hydrofarm
thermostat is by far the best: http://www.amazon.com/gp/product/B000NZZG3S/ref=ox_sc_sfl_title_9?ie=UTF8&psc=1&smid=ATVPDKIKX0DER - this is important,
because both heat pads and CHE will otherwise overheat. You can use a smaller
ceramic dome fixture for this, since the CHE is only 60W.

You also want
to get a temp gun so you can check
the temperature immediately under the basking spot. Here's the one I have used
for several years and love: Etekcity®
774 (ETC 8380) Digital Infrared (IR) Thermometer with Laser Sight, -58~+716°F,
12:1 D:S, Instant-read Temperature Gun, Battery Included
DIET
Baby tortoises should be fed the same widely varied diet of edible leaves and weeds and greens and flowers that an adult eats. Special care should be
taken to provide maximum nutrition. Here is a link to The Tortoise Table’s
printable plant booklet: http://www.thetortoisetable.org.uk/site/files/Edible%20doc%203rd%20edition_2013_condensed.pdf
The Tortoise Table database is also an excellent resource when checking
if plants are safe to feed your tortoise. Please always err on the side of
caution!
We are lucky to have weeds here most of the year, so I feed cat's tongue, thistle (sow thistle, mostly), hawksbit, plantain, mallow, grape leaves, and hibiscus leaves and flowers, violet leaves and flowers, sedum, daylily flowers, miner’s lettuce, dead nettle, rose petals (only from untreated, unfertilized plants), turnip greens, and many other plants on the 'safe' list of The Tortoise Table database. I add in some dandelions, but only when there aren't other things. If you don't have access to weeds during the winter, you can feed mustard greens, kale, and collard greens. Opuntia cactus (called ‘nopales’ in Hispanic grocery stores) is high in calcium, and can be added to the diet occasionally. There are many other tortoise-safe weeds that may be available throughout the year that I did not mention here.
I don’t give the babies any lettuce, just because the nutritional value isn't great, but if you find yourself in a bind, that would be an option, too.
I don't chop any of it up, or even tear it up. I like to make them work a little bit to get their food.
A rule of thumb is to give them a pile of food about the size of their
shell. As long as babies are kept nice and humid, and the food you offer is
healthy, you can allow them to eat their fill - if the food is all gone by
mid-day, it's totally fine to give them a second helping.
I have never fed any factory-made foods (mazuri or Zoomed grassland or other), simply because it's not necessary here, and because I don’t trust the formulation. I prefer to cook from scratch for my human kids, so it made more sense to go the natural route for the babies as well. If you do feed mazuri, I won't judge – please do your research! |
| (a few examples of edible weeds) |
I do not feed ANY fruit, and only very occasionally (1x per month) feed
a vegetable such as a bit of pumpkin, winter squash, or a bit of carrot, for
the vitamin A in it. Fruit is too high in sugar, and not only can become
addicting, but it can also harm a tortoise’s gut. It also creates a favorable
environment in the gut for parasites (worms and flagellates) to thrive. If I want
to give my tortoises a ‘treat’ I give them a flower, or an especially juicy
sedum leaf, or a slice of opuntia cactus.
SUPPLEMENTATION
I sprinkle TNT
(Carolina Pet Supply) 3x per week, and calcium powder 2x per week. I also have cuttlefish bone (which is
available in the bird aisle of the pet store) in there, to which I have seen
them help themselves. The babies also have a home-made calcium block available in their
enclosure, which they like (instructions: http://tortaddiction.blogspot.com/2014/10/how-to-make-home-made-calcium-blocks.html).
SOAKING
Baby tortoises have less body mass, and as a result, are more prone to
dehydration. Even if babies frequently self-soak in their water dishes, it is
recommended to soak them every day when they are very small, and every other
day once they are a few months old. Tortoises need water to maintain good
hydration and for proper organ function.
A soaking container should have tall enough sides that your tortoise
can’t climb out. The water should be lukewarm and shallow, just about up to the
seam where the top shell (carapace) meets the bottom shell (plastron).
Some people put a washrag into the soaking container, to provide a
little more footing to the tortoise. A soak should last about 20 minutes – you
may need to change the water if it gets too soiled, or too chilly.

We
soak our baby tortoises during breakfast. This is fun for the kids (‘breakfast
buddies’!), and it also makes it easy for us to keep an eye on them to ensure
they don’t flip over and/or drown.
Tortoises will often poop during their soak. They will also often
release urates – which are a white creamy (or lightly granular) substance. Both
are perfectly normal.
DAILY CARE ROUTINE
Several people have asked me what my daily routine is with the tortoises, since it does take a little bit of time to care of tortoises properly. I have found that associating tortoise care with our regular daily activities makes it easy to find a good routine.
Several people have asked me what my daily routine is with the tortoises, since it does take a little bit of time to care of tortoises properly. I have found that associating tortoise care with our regular daily activities makes it easy to find a good routine.
In the morning the lights turn on by themselves, controlled by a timer.
After getting dressed, I get the babies and their soiled water dishes out of
their enclosure. I place the tortoises in their soaking containers, and I clean
the water dishes. The baby tortoises soak while we eat breakfast. After about
20 minutes (during which I’ve also fixed school lunch for kids, and made sure
they brushed their teeth etc), I put the babies back into their enclosure. I
give them a nice big pile of weeds (sprinkled with TNT), and mist the
enclosures thoroughly with warm water. Then we go about normal morning
activities.
Mid-morning my youngest and I usually go outside on a walk or into our yard to pick weeds for the next day. When we get home, I mist the babies again, wash and pack up the weeds, and continue with our day. Sometime in the afternoon I check on the babies, mist them, and if they have eaten all their food, I give them a second pile of weeds. Before starting dinner, I usually mist them one more time, and the lights turn out around 7pm.
Mid-morning my youngest and I usually go outside on a walk or into our yard to pick weeds for the next day. When we get home, I mist the babies again, wash and pack up the weeds, and continue with our day. Sometime in the afternoon I check on the babies, mist them, and if they have eaten all their food, I give them a second pile of weeds. Before starting dinner, I usually mist them one more time, and the lights turn out around 7pm.
I weigh them about once every 2 weeks. The pill bugs take care of most
of the clean-up in the enclosures. As needed I replace sphagnum moss, rearrange
tortoise furniture (if e.g. they outgrow things, or they climb on things
dangerously), add new plants, etc.
A note: Our tortoises are used to
normal family activities around them. Their enclosures are in our living room,
and the kids play around them, are loud, and watch them. They sit on our dining
table for their morning soak, with little faces peeking down at them. However,
I minimize how much we actually touch and handle the tortoises. I believe that
observing them in a natural habitat is more beneficial than constantly actively
interacting or playing with them. As I check on them throughout the day, I
might place one of them that I’ve noticed has been sitting on the cool end for
a long time into the hot humid hide. But for the most part, I just let them do
their own tortoise thing. Please don’t handle your baby too often – this can
cause stress, which can lead to them eating less, which can slow down their
development.
KEEPING MORE THAN ONE?
Tortoises, especially Russian tortoises, are very territorial, and can
become violent towards others of their kind. Sometimes bullying is more subtle,
but just as deadly. I do not recommend keeping more than one tortoise in an
enclosure once they are older than two years. I definitely do not recommend
keeping a baby tortoise together with an adult tortoise!

When they are babies, you can sometimes get away with keeping multiples
in an enclosure that is large enough. However, please keep a constant watchful
eye on them, to make sure both are thriving!
For more reading on the hazards of keeping 2 tortoises together, please
refer to my blog post: http://tortaddiction.blogspot.com/2013/09/why-not-to-keep-2-tortoises-together.html
If you have the resources to provide individual set-ups that are large
enough, and you have the time to care for multiple tortoises… obviously there
is no reason not to have more than one tortoise… just don’t house them together
as adults!
Disclaimer: This care sheet has been compiled based on
information I have gained from more experienced breeders/tortoise keepers, such
as Melissa, and Tom, Gary, Tim, and others (THANK
YOU!). There are excellent care sheets available e.g. on the Tortoise Forum (http://www.tortoiseforum.org/threads/russian-tortoise-care-sheet.80698/). I have written this care sheet
because I know some of you want more detail, and so that you will have
something printable in hand, with detailed pictures.
Resources for further
reading:
Melissa’s Russian tortoise care sheet, posted on the Russian Owners Facebook group (you may have to join the group to view it): https://www.facebook.com/groups/2209332828/10152298625877829/
Melissa’s Russian tortoise care sheet, posted on the Russian Owners Facebook group (you may have to join the group to view it): https://www.facebook.com/groups/2209332828/10152298625877829/
Please feel free to join the Facebook group “Russian Tortoise Owners”
Joe Heinen’s page on RTs: www.russiantortoise.net
The Tortoise Forum: www.tortoiseforum.org
Tom’s care sheet: http://www.tortoiseforum.org/threads/russian-tortoise-care-sheet.80698/
Shelled Warriors: www.shelledwarriors.co.uk
The Tortoise Table (info on plants): http://www.thetortoisetable.org.uk/
The Tortoise Trust (good info on hibernating etc.): http://www.tortoisetrust.org/
My tortoise blog: www.tortaddiction.blogspot.com
Carolina Pet Supply: http://www.carolinapetsupply.com
(to order TNT and seed mixes from)

Please never hesitate to ask questions!